Wednesday 28 November 2012

Weird War Adventure - The Comic!


So I just ran my Weird War adventure for my regular role playing group and I wanted to show you how it worked out.  

I'm waiting for some photos of the game so a full game report will follow soon but in the meantime one of the players, my good and talented friend Roy has put together a Comic of the game.

I hope you enjoy it as much as I did.


Tuesday 20 November 2012

Weird War II adventure final preparations


With my eagerly anticipated (at least by me!) Weird War II game imminent I finally got my act together and finished off the last few miniatures I had taking up space on my painting table.

Just a quick note.  I know the British Royal Marine Commandos wore Green Berets and the Paratroop Regiment wore Red, these models are intended to represent a fictional unit similar to the SAS (who wore also wore red in Europe at that time) and for that reason their Berets are a different colour.

I had three French Resistance soldiers (from Artizan Designs) to complete and one of them is to represent a player character.  The kneeling figure with several days stubble will be Dave's Polish soldier.  I also painted another British Commando bringing the full complement of player character models to six.

Not much more to say at the moment, I want to share the details of the characters and the plot they'll be facing on Sunday but I don't want to spoil the surprise for my players so you'll just have to wait!


Tuesday 13 November 2012

How to: Make a Custom GM Screen


In preparation for my Weird War II game I went looking for a GM Screen, unfortunately I couldn't find exactly what I wanted.

So I decided to make my own and you can too.


You will need:
3x 25mm Ring Binders with display pockets on front & back.  
1x Roll of Double sided tape
Scissors
4x Plastic Document Pockets


Lay out one of your folders making sure (and then checking again) that the opening to the pockets on the other side is at the top.  


Cut eight strips of double sided tape and stick them on the inside covers.  Carefully peel off the backing tape on the strips.  


Take your next binder, and again checking that the opening to the display pocket on the front is at the top, carefully line up the edges and place the folder on top of the sticky tape and repeat on the other side.

You can just use two binders but I like a lot of room to roll dice and keep my handouts and maps organised so I recommend using three, they still fold up neatly.


Next prepare the Document Pockets.  Stick the double sided tape on one side of each pocket, I found a long strip at the top & the bottom worked well.  Stick the pockets to the inside covers of your screen,  try to keep the pocket taught so it doesn't gape open.

And your pretty much done.  I printed some appropriate art for the four pockets facing my players and the rules and tables I'll want to check often in the pockets inside.

When you change games to a different system or genre you can just switch out the art & rules pages to suit the new game.  


Monday 12 November 2012

5000 Visits to my Blog!


Hi everyone.

I've just had my 5000th visit to my Blog !  I'm very pleased as this doesn't track my own visits and I was fairly sure that no one but me would ever look at it!

Back in July when I started this blog I wanted to share what I was doing and maybe provide some inspiration to other Roleplayers that might want to use miniatures in their tabletop games.  Over that time my painting skills have improved, i've learned some new techniques, won prizes in a couple of competitions and painted some models i've been really proud of.  

In the last five months I've made 40 posts on subject like what scenery to use, Step by Step Guides and rants about Games Workshop and i'm glad you've enjoyed them.

Over the next few months i'm hoping that our local games will actually use miniatures more often so I can give you some reports and in game photos, a guide to making your own custom GM Screen, more photography guides and in March I have an enormous delivery of Bones Miniatures to look forward to.

Anyway, thanks for the support everyone.  Lets see if we can hit the next milestone of 10,000 posts in less time!  


Sunday 11 November 2012

Getting my Weird War II game ready


I've been planning my next turn at running a RPG game for rather a long time, in fact thats the first project I had planned at the begining of July when I started this blog.  Well the time has come and the game is due to start on the 25th November so I have a few things left to do.

I can't share everything i'm going to do just yet as I know some of my players will be reading this blog and I don't want to spoil the surprise.  I have got four more miniatures to paint  which will bring the total number of miniatures i'll have ready to 55.  

The adventure is fully written (i'll share that with you once we've finished) and I have most of the scenery and vehicles i'll need.  I've chosen the background music which will add ambiance and i've got some WW2 books with photos of the war as props to help the guys get in the mood.  I've also got some documents the players might find which i've translated into German (and in English to give to the character's that took German as a Skill)

I'm using the Savage Worlds system which uses playing cards to determine who acts in each round and 'Bennies' to represent a hero's luck.  The heroes get three tokens which can be cashed in to get a reroll or other benefits.  For this game i'm using rather distinctive tokens....


My very talented photographer friend Roy has helped me out with some excellent scenery and vehicles including an abandoned french farmhouse and lots of German half tracks, tanks, trucks and motorbikes.  I think this is the most prepared i've ever been for a game.

I do still have a few things to do though.  I need lots of trees and I need to make a GM Screen, i'll make another post on making a custom modular (and importantly Cheap) GM screen soon.


Saturday 10 November 2012

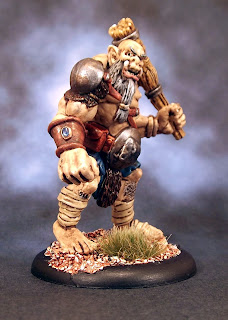
Reaper Bones Ogre


Another week, another Bones miniature.  After this one I just have the Minotaur left to do so I promise i'll be onto something new very soon.  I struggled a bit with this one due to lots of distractions away from the paint table and he's not 100% finished.  He could really do with more work on the kilt, the strap across his bandages on his left hand and some brighter highlighting on his club.
Overall the miniature is pretty good, the detail is clear and the mold lines aren't too bad and the paint job is certainly good enough for its tabletop purposes but I just didn't enjoy painting it as much as the other bones miniatures, I think that's just me being peculiar though.
I wanted the club to look like fairly new softwood, not really the best choice for a club but he is a stoopid ogre and I didn't want the heaviness of a darker brown to draw attention away from his face. 
In hindsight I think I should have chosen either a darker skin tone or a lighter tone for the bandages as the photo makes them fade in a bit more than they are in real life.  On that subject i'm continually disappointed with the performance of my camera.  Its just not up to the job of macro photography and i'm definitely going to look at getting something more suitable.

The next painting job will be the Artizan WW2 French Resistance and a British Soldier because my game is finally starting.  In fact the next post will be about the preparation for that game.


Saturday 3 November 2012

Reaper Bones Werewolf


'Hi everyone, my name's Richard and i'm a Bones Addict.'  


'Hi Richard!'

'I've been painting them for several months and can't seem to kick the habit.  I'm just taking it day by day folks!'

Applause


The next Bones miniature I wanted to have a go at was the Werewolf.  Its not my favourite sculpt by a long way (the arms are too long and the claws too short for my taste and the mould line...well i'll talk about that later) but I wanted to see what I could make of it.  And I needed a Werewolf for my tabletop collection.


Normally I would have gone with a dark brown paint scheme but since I did the Great Worm in brown/sand last week I thought i'd go with something different.  I searched the interweb for inspiration and not surprisingly found lots of photos of Timber, Winter and Grey Wolves which looked great.  

So I settled on a Grey scheme with nice red eyes and creamy teeth.  If you look at predators in the wild they keep their teeth very very clean, I wish I could say they same about my kids.  Wolves teeth aren't white, they're normally an off white with a black gum.

Wolf fur ranges from brown/tan and black on a white base to almost pure white with every shade in between.  I wanted a bluish grey and it turned out pretty much as I wanted.  

I started with a base coat of Citadel Fortress Grey then layered dark grey washes over the skin and fur getting a bit darker each time.  I then highlighted with Fortress Grey mixed with White, about 50:50 over the exposed muscles and did another pass once it was dry with the same colour but with a bit more white, this only went on the higher or more exposed surfaces of the muscles.

The mouth was painted with a dark Citadel Scab Red but the tongue was a more baby pink colour and the teeth were Citadel Ushabti Bone.  These got a light wash of Citadel Nuln Oil to stop them looking like granny's false teeth.  The claws were a very dark grey with black lowlights

I have to admit the mould line on this one is quite horrible and if i'd realised how badly it would show up on the photos i'd have smoothed it off somehow.  Its always difficult to get rid of a mould line when it isn't on a flat surface though and this one ran all the way over fur.

More photos below, click to see a larger version!